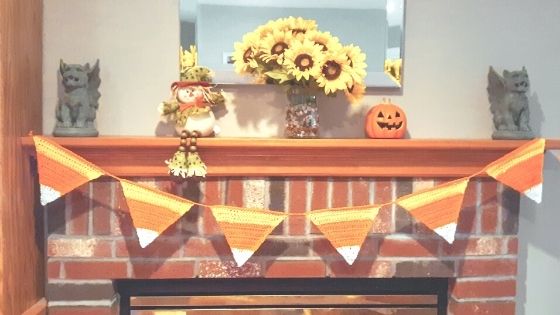
Looking for cool Halloween and Thanksgiving decor? Candy Corn Garland is the perfect decoration for your mantle or window. Bonus? So EASY to crochet!
Pin it now, Make it Later
Every year, I wade into the great candy corn debate. Some people love it and others hate it. Me? I am one of those who LOVE candy corn. So much that every single Halloween I will over indulge on it and end up with a massive sugar hangover. Every. Single. Halloween.
Yeah my husband gives me that same look too.
Luckily for me, this candy corn crochet garland won’t trigger a headache, even if I crochet too many (If that is even possible).
The candy corn crochet pattern works up super fast and doesn’t require a lot of yarn. This could be a great stash busting project. The pattern uses only simple stitches: chain, DC, and DC2TOG. That is it!

Materials:
NOTE: The materials noted in this section are to make 1 candy corn crochet triangle. I will give my totals in yards for making 8, however you may need more or less yarn depending on how many candy corn crochet triangles you need.
1 Triangle
- Yellow: 2 yards
- Orange: 3 yards
- White: 1 yard
What I used (8 Triangles)
- Yellow: 16 yards (Big Twist Baby in Baby Dandelion)
- Orange: 24 yards (Red Heart Super Saver in Pumpkin)
- White: 8 yards (Red Heart Super Saver in White)
Hook: U.S. H/8 – 5.00mm
Also needed:
- Scissors
- Tapestry needle for weaving in ends.
Gauge: (U.S. H/8 – 5.00mm) 7 stitches/4 rows = 2×2 inch square in double crochet
Stitches Used:
- DC = Double Crochet
- DC2TOG = Double Crochet 2 Stitches Together
- CH = Chain

Related: How-to Calculate Yarn Length from Weight
Pattern:
Start with Yellow
Chain 26
Row 1: DC in 3rd chain from hook. DC in each stitch across. Ch 1. Turn = 25 DC
Row 2: DC2TOG, DC in next 21 stitches, DC2TOG. Ch1. Turn = 23 DC
Row 3. DC2TOG, DC in next 19 stitches, DC2TOG. Ch1. Turn = 21 DC
Change to Orange

Row 4. DC2TOG, DC in next 17 stitches, DC2TOG. Ch1. Turn = 19 DC
Row 5. DC2TOG, DC in next 15 stitches, DC2TOG. Ch1. Turn = 17 DC
Row 6. DC2TOG, DC in next 13 stitches, DC2TOG. Ch1. Turn = 15 DC
Row 7. DC2TOG, DC in next 11 stitches, DC2TOG. Ch1. Turn = 13 DC
Row 8. DC2TOG, DC in next 9 stitches, DC2TOG. Ch1. Turn = 11 DC
Row 9. DC2TOG, DC in next 7 stitches, DC2TOG. Ch1. Turn = 9 DC
Change to White

Row 10. DC2TOG, DC in next 5 stitches, DC2TOG. Ch1. Turn = 7 DC
Row 11. DC2TOG, DC in next 3 stitches, DC2TOG. Ch1. Turn = 5 DC
Row 12. DC2TOG, DC in next 1 stitch, DC2TOG. Ch1. Turn = 3 DC
Row 13. DC3TOG. = 1 DC
Fasten off and weave in all ends.
Finishing
Block your triangles. This will allow you to fix the corners to look sharper and relax the stitches.
To attach
Ch 5
Join chain to first yellow corner of the triangle
SC across using the join color across the top of the triangle
Ch5
Repeat with the next triangle.
End with a Ch 5. Fasten off and weave in all ends.

SHARE, LIKE, SUBSCRIBE!
If you use this pattern, please feel free to tag me on Instagram or Facebook. with #NEMCrochet I would love to see it! Also if you find a mistake here or have a question about it, please do not hesitate to contact me.
If you liked this pattern, be sure to share it with your friends and followers, I truly appreciate it. For more free patterns and stitch tutorials – follow my Instagram or Facebook and allow notifications to get a pop-up whenever new post is published.
